Hummer Foto Feeder™

Hummer Foto Feederâ„¢
All Products are Here

2010-03-11

Hummer News – Vol. 7 – March 2010

Hummer News – Vol. 7 – March 2010

After several warm sunny days this week and setting our clocks ahead this weekend, I can finally really begin to think about my hummers returning within the next four to six weeks. I can hardly wait. I hope they will be early this year as it has seemed a long and cold winter, even though the most of the crazy east coast snow was deposited just about everywhere else but here – just fine by me.

Time to prepare all your feeders and nectar tubes

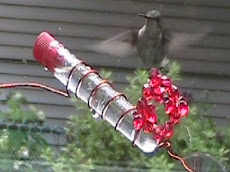
If you haven’t already done so, now would be a very good time to clean all bird feeders, not only your hummer feeders with a mild, 10% bleach solution and a good rinse before the season begins. For you year round folks, spring would always be a good time to do a thorough clean-up, as well as several other times each year. Anytime that any black residue is building up on any nectar feeder or part, it is essential for the health of your visitors to give everything a good scrubbing.

MerrComm Product Feedback Welcomed and Strongly Encouraged

I am especially interested to hear any feedback from recent customers who have purchased a Roseburg™ 4-tube feeder, a Hummer Stik™ hand held feeder, a Nectar Tube cleaning brush set or Nectar storage and dispensing bottle. I want all of these products to be the best I can make them and your feedback is a very important component to in helping me accomplish that.

Our blog awaits and welcomes you…

Please visit your blog Hummingbird Haven and better yet, please jump in. I have just posted a new video from southern California and will be putting up the fact and instruction sheets for all the current products. If you’ve lost the email inviting you to be a fully enabled post author, just drop me an email and I will send a new one. Just reply to that invitation and join the fun. Find the blog here: http://hummerhaven.blogspot.com/

Happy Hummers and Sweet Dreams of Spring, just around the corner until the next time…

Copyright 2010, Merritt Communications, Inc. – All Rights Reserved

Another Reason To Wish I Were in Southern California

Ronnie, a brand new Hummer Foto Feeder™ customer from Riverside, CA sent in this video of one of their brand new little visitors…


Ronnie, a brand new Hummer Foto Feeder™ customer from Riverside, CA sent in this video of one of their brand new little visitors…

The MerrComm Hummer Stik™


Instructions for Use and Care


1) Hand-Held Operation –while sitting as quietly and still as you can, hold the Hummer Stik™ in your hand in close proximity to known feeding locations like gardens or established nectar feeders.


2) Soil Anchored Operation – press the Hummer Stik™ firmly into the soil of pots, deck planters, gardens or any other place you would like to attract your hummers. If there are colorful flowers nearby, it is a plus in attracting hummers initially. I have sometimes attached some extra red color, typically a piece of red ribbon or artificial red flowers, until the hummers find the feeder.


3) Wrap-On Operation – simply wrap rugged but flexible leg of the Hummer Stik™ around any convenient object and tilt just the way you like.


4) Place the feeding tube (filled with nectar and with the cap firmly attached) into the spiral copper mount.


5) Nectar Formula: add 1 part (white refined only) sugar, by volume, to 4 parts very hot, but not boiling water, also by volume. (Raw, natural and dark sugars all contain harmful elements for hummers, including a poisonous level of iron for the birds) Stir vigorously with a clean spoon until all the sugar is dissolved. It is NOT necessary to sterilize by boiling (all elements leading to fermentation are introduced to the nectar by the birds themselves and cannot be avoided) and you should never use colors, artificial sweeteners or honey, which can harm hummers. I use a one-quart, oven safe, baking measure pitcher and add one cup of sugar. I then run my tap water to the highest temp (I do keep mine rather high) and I add to the sugar in a fine stream, stirring furiously the whole time, until I get up to the full quart. If you find the tap water does not get hot enough to fully dissolve all the sugar, you can heat the water first, but, again, no need to boil. As long as your utensils and containers are clean to start, the nectar can be stored in the fridge for quite a while in an airtight container – I typically use an empty plastic water bottle. It is good until it becomes cloudy or begins to have a slightly fermented – alcoholic – aroma.


6) Once the hummers in your neighborhood discover the feeder, they will make regular visits as long as the nectar is kept full and fresh (at our house, dawn and pre-dusk seem to be the most popular times). Until they begin to feed, pay close attention to the clarity and aroma of the nectar and refill as described in the next instruction.


7) Because this feeder is designed to point upwards, no nectar will be leaking with the expansion and contraction due to temperature variation, as with virtually every other nectar feeder I have tried. However, it also means that the hummers will not be able to completely empty the tube, though you will be quite surprised to see how deeply into the feeding tube they can reach with bill and fully extended tongue. (Hummers do not "suck" in the nectar; they lap it up with a long and very speedy tongue). When the nectar level in the tube does not drop any lower, top off the tube with fresh nectar. However, if the remaining nectar is ever cloudy or gives off a slightly alcoholic scent (the sugar in the nectar will ferment) clean the tube well with warm water and add fresh nectar. Fresh nectar has no aroma at all.


8) Every few weeks or whenever the feeding tube shows signs of dirt or sugar residue (will look black after a while) clean the tube and cap fully in a 10% bleach solution and rinse thoroughly before refilling with nectar. The bleach solution will not harm the birds and is widely recommended by hummer specialists for keeping feeders safe for birds.


9) One of the best attractors for hummers I have ever found is to install a fine mister attachment (available at many bird supply companies) to a hose in the yard and have the mist fall over some thick bushes – or attach to a traditional birdbath. Hummers don't normally drink at regular birdbaths or water stations, but love to hover in the mist or "leaf-surf" over the wet leaves – this is a truly magical behavior to watch, as they become practically intoxicated, along with most other birds in your yard.


10) For photographic purposes, choose a location that will permit you to set up your camera equipment nearby inside. The ideal set-up will include a tripod mounted still or video camera. Add to this a seat for comfort while waiting to trigger camera, or some un-attended triggering mechanism. I will often use a video camera and let it run for a period of time when hummers are likely to arrive. I then extract individual frames for still photos. I use the same videotape over and again for this purpose. Another approach would be a camera with a time-lapse trigger mechanism that would take a shot at pre-set intervals. Of course, a wireless or long cable shutter release will make live watching for your shot easier to execute and you don't need to be close enough to the window to disturb birds approach. It is also important to minimize inside light sources that will reflect off of the inside of the window and obscure the image shot through it.


11) The Hummer Stik™ is ideal for traveling, as it can be easily carried in a sealed plastic bag and placed in any available soil during travel to try to attract hummers in the areas visited

You can find this feeder here:

The MerrComm Hummer Foto Feeder™


Instructions for Use and Care


1) Moisten the surface of the feeder's suction cup mount and press firmly into place on a convenient window for viewing or taking photographs. If there are colorful flowers nearby, it is a plus in attracting hummers initially. I have sometimes attached some extra red color, typically a piece of red ribbon or artificial red flowers, until the hummers find the feeder. Tilting the feeder to the left or right can increase viewing visibility of feeding birds.


2) Place the feeding tube (filled with nectar and with the cap firmly attached) into the spiral copper mount. The curved wire at the top of the feeder is the perch. You can swing it out of the way to try to force hovering shots.


3) Nectar Formula: add 1 part (white refined only) sugar, by volume, to 4 parts very hot, but not boiling water, also by volume. (Raw, natural and dark sugars all contain harmful elements for hummers, including a poisonous level of iron for the birds) Stir vigorously with a clean spoon until all the sugar is dissolved. It is NOT necessary to sterilize by boiling (all elements leading to fermentation are introduced to the nectar by the birds themselves and cannot be avoided) and you should never use colors, artificial sweeteners or honey, which can harm hummers. I use a one-quart, oven safe, baking measure pitcher and add one cup of sugar. I then run my tap water to the highest temp (I do keep mine rather high) and I add to the sugar in a fine stream, stirring furiously the whole time, until I get up to the full quart. If you find the tap water does not get hot enough to fully dissolve all the sugar, you can heat the water first, but, again, no need to boil. As long as your utensils and containers are clean to start, the nectar can be stored in the fridge for quite a while in an airtight container – I typically use an empty plastic water bottle. It is good until it becomes cloudy or begins to have a slightly fermented – alcoholic – aroma.


4) Once the hummers in your neighborhood discover the feeder, they will make regular visits as long as the nectar is kept full and fresh (at our house, dawn and pre-dusk seem to be the most popular times). Until they begin to feed, pay close attention to the clarity and aroma of the nectar and refill as described in the next instruction.


5) Because this feeder is designed to point upwards, no nectar will be leaking with the expansion and contraction due to temperature variation, as with virtually every other nectar feeder I have tried. However, it also means that the hummers will not be able to completely empty the tube, though you will be quite surprised to see how deeply into the feeding tube they can reach with bill and fully extended tongue. (Hummers do not "suck" in the nectar; they lap it up with a long and very speedy tongue). When the nectar level in the tube does not drop any lower, top off the tube with fresh nectar. However, if the remaining nectar is ever cloudy or gives off a slightly alcoholic scent (the sugar in the nectar will ferment) clean the tube well with warm water and add fresh nectar. Fresh nectar has no aroma at all.

6) Every few weeks or whenever the feeding tube shows signs of dirt or sugar residue (will look black after a while) clean the tube and cap fully in a 10% bleach solution and rinse thoroughly before refilling with nectar. The bleach solution will not harm the birds and is widely recommended by hummer specialists for keeping feeders safe for birds.


7) One of the best attractors for hummers I have ever found is to install a fine mister attachment (available at many bird supply companies) to a hose in the yard and have the mist fall over some thick bushes – or attach to a traditional birdbath. Hummers don't normally drink at regular birdbaths or water stations, but love to hover in the mist or "leaf-surf" over the wet leaves – this is a truly magical behavior to watch, as they become practically intoxicated, along with most other birds in your yard.


8) For photographic purposes, choose a window mounting location that will permit you to set up your camera equipment nearby inside. The ideal set-up will include a tripod mounted still or video camera. Add to this a seat for comfort while waiting to trigger camera, or some un-attended triggering mechanism. I will often use a video camera and let it run for a period of time when hummers are likely to arrive. I then extract individual frames for still photos. I use the same videotape over and again for this purpose. Another approach would be a camera with a time-lapse trigger mechanism that would take a shot at pre-set intervals. Of course, a wireless or long cable shutter release will make live watching for your shot easier to execute and you don't need to be close enough to the window to disturb birds approach. It is also important to minimize inside light sources that will reflect off of the inside of the window and obscure the image shot through it.


9) The Hummer Foto Feeder ™ is ideal for traveling, as it can be easily carried in a sealed plastic bag and placed on any vehicle or dwelling window during travel to try to attract hummers in the areas visited.


I am very happy to answer any questions you may have about the feeder or humming birds, if I can.  You can find the Hummer Foto Feeder™ here:


Spare Nectar Test Tubes


Once your hummers really get into the swing of the season, it is always convenient to have plenty of full,  nectar tubes, in the fridge, ready to swap for emptied ones at a moment's notice. If you need more tubes, you can find them here:

500ml Nectar Storage and Dispenser Bottle


This handy and convenient bottle serves two purposes. First, it stores over two full pints of prepared nectar in the fridge. Second, the easy squeeze delivery makes filling multiple nectar tubes at the same time very easy indeed. You can find this useful item here:


Brush Set for Nectar Test Tubes


This set of brushes has been selected to be the perfect size for cleaning not only the test tube nectar containers, but also the tiny hole in the cap through which hummers take all their nectar and which are most subject to dirt build up. This and all other MerrCom hummingbird products can be found here: